現状の202306イメージのDebianだとSambaがインストールできない(202308イメージは可能)ようなので、ユーザーランドのみUbuntuにしてみる。
こちらの方↓がやり方を詳しく教えてくださっているので試してみる。
結果、Sambaは普通にインストールして使えたが・・・今度はWifiのドライバーがうまくあてられず、使えなかった。
以下、メモ的に作業を残しておきます。
202306イメージを改造してUbuntuにする
202306イメージのDebianのMicroSDカードのブートローダーのみを使って、↓mmcblk1のPartition4のみUbuntuniする。
sudo parted /dev/mmcblk1 print
Model: SD ED4QT (sd/mmc)
Disk /dev/mmcblk1: 128GB
Sector size (logical/physical): 512B/512B
Partition Table: gpt
Disk Flags:

Number  Start   End     Size    File system  Name  Flags
 1      2097kB  4194kB  2097kB
 2      4194kB  8389kB  4194kB
 3      8389kB  113MB   105MB   fat16              boot, esp
 4      113MB   128GB   128GB   ext4


cat /proc/cmdline
root=/dev/mmcblk1p4 rw console=tty0 console=ttyS0,115200 earlycon rootwait stmmaceth=chain_mode:1 selinux=0
Ubuntuダウンロード・インストール作業
ダウンロードして仮にログイン
適当なフォルダで作業。
sudo chmod 777 .
wget http://cdimage.ubuntu.com/ubuntu-base/releases/22.04/release/ubuntu-base-22.04.2-base-riscv64.tar.gz
mkdir rootfs
sudo tar pxf ubuntu-base-22.04.2-base-riscv64.tar.gz -C rootfs
echo 'APT::Sandbox::User "root";' | sudo tee rootfs/etc/apt/apt.conf.d/90run-as-root
APT::Sandbox::User "root";

sudo apt install systemd-container binfmt-support qemu-user-static
sudo cp /usr/bin/qemu-riscv64-static rootfs/usr/bin/
ログインはWindowsのUbuntu だとダメだった。
sudo systemd-nspawn -D rootfs

WindowsのUbuntuだと以下のようになってログインできない。
Spawning container rootfs on /mnt/c/Users/GO//rootfs.
Press ^] three times within 1s to kill container.
Failed to open system bus: No such file or directory
VisionFive2で作業
仕方がない、VisionFive2で作業する。
sudo systemd-nspawn -D rootfs
Spawning container rootfs on /mnt/soko2t/2/rootfs.
Press Ctrl-] three times within 1s to kill container.
root@rootfs:~# dpkg --print-architecture
riscv64
apt update && apt full-upgrade -y && apt autoremove -y
apt install -y standard^ server-minimal^
apt install avahi-daemon vim
ここまでできたら、あとは設定していく。
設定
ディスク追加しないほうが良いかも。あとからでもできる。
vim /etc/fstab
UUID=5d62c0f8-172c-42d7-8765-0faa7165b7f9   /mnt/soko2t ext4    defaults        0       0
認識されないSSDがあるとちゃんと起動しないので、とりあえずfstabでマウントしない。
ネットワーク
Windows↔VisionFive2に有線LAN接続すれば、visionfive2.localにSSHでログインできるようになる。
vim /etc/hostname
visionfive2

vim /etc/hosts
127.0.0.1       localhost
127.0.1.1       visionfive2
cat <<EOF > /etc/netplan/01-base.yaml
network:
ethernets:
eth0:
dhcp4: true
version: 2
EOFユーザー追加
ルートにパスワードが無いので作って、新たにユーザーを作ってsudoできるようにしておく。
コレをしないとVisioFive2で起動したときにルート権限の必要な操作ができなくなってしまう。
adduser --gecos GO go
gpasswd -a go sudo#ユーザーがsudoできるようにする。

passwd root#ルートパスワードも設定しておく
New password:
Retype new password:

cat /etc/passwd#Userちゃんと作成できてるか確認する
root:x:0:0:root:/root:/bin/bash
~
sshd:x:108:65534::/run/sshd:/usr/sbin/nologin
avahi:x:109:114:Avahi mDNS daemon,,,:/run/avahi-daemon:/usr/sbin/nologin
go:x:1000:1000:GO,,,:/home/go:/bin/bash

cat /etc/group | grep sudo#作ったユーザーがsudoできるかチェック
sudo:x:27:go
SSH
SSHを使えるようにする。
sed -i 's/^#\(PasswordAuthentication\) .*$/\1 yes/' /etc/ssh/sshd_configブラックリスト
必要ない?かもだけど一応操作しておく。
cat <<EOF > /etc/modprobe.d/blacklist-starfive.conf
blacklist starfive_mailbox_test
blacklist e24
blacklist xrp
blacklist starfive_mailbox
EOF
ドキュメント類インストール、Yでリターン
/usr/local/sbin/unminimizeログアウト
rm /etc/apt/apt.conf.d/90run-as-root
exit
sudo rm rootfs//usr/bin/qemu-riscv64-static
カーネルモジュールコピー
sudo rsync -a /usr/src/linux-headers-5.15.0-starfive rootfs/usr/src/
rsync: [sender] link_stat "/usr/src/linux-headers-5.15.0-starfive" failed: No such file or directory (2)
rsync error: some files/attrs were not transferred (see previous errors) (code 23) at main.c(1338) [sender=3.2.7]
無い↑ので必要ない??
sudo rsync -a /usr/src rootfs/usr/src/
sudo rsync -a /usr/lib/linux-image-5.15.0-starfive rootfs/usr/lib/
sudo rsync -a /lib/modules/5.15.0-starfive rootfs/lib/modules/
アーガイブ
できたUbuntuをアーガイブにしておく。
(cd rootfs; sudo tar --same-owner -capf ../visionfive2.base.tar.gz *)WindowsにDebianの入ったext4マウント 失敗
管理者としてPowerShellを起動して以下を入力。
wmic.exe diskdrive get deviceID,Caption
Caption                               DeviceID
CSSD-M2B2TPG3NF2                      \\.\PHYSICALDRIVE1
Kingston UHSII uSD Reader USB Device  \\.\PHYSICALDRIVE3
Hanye HE70-2TBNHS1                    \\.\PHYSICALDRIVE0
Realtek RTL9210B-CG SCSI Disk Device  \\.\PHYSICALDRIVE2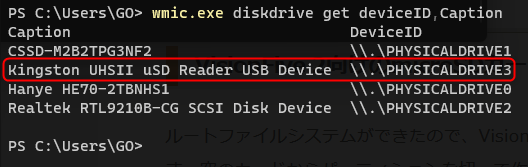
一応あるが、うまくマウントできなかった。MicroSDカードリーダーがダメなのか不明。
GET-CimInstance -query "SELECT * from Win32_DiskDrive"
DeviceID           Caption                              Partitions Size          Model
--------           -------                              ---------- ----          -----
\\.\PHYSICALDRIVE1 CSSD-M2B2TPG3NF2                     3          2000396321280 CSSD-M2B2TPG3NF2
\\.\PHYSICALDRIVE3 Kingston UHSII uSD Reader USB Device 4          127861977600  Kingston UHSII uSD Reader USB Device
\\.\PHYSICALDRIVE0 Hanye HE70-2TBNHS1                   1          2048407280640 Hanye HE70-2TBNHS1
\\.\PHYSICALDRIVE2 Realtek RTL9210B-CG SCSI Disk Device 1          2000396321280 Realtek RTL9210B-CG SCSI Disk Device
wsl --mount \\.\PHYSICALDRIVE3 --bare
指定されたドライブが見つかりません。
Error code: Wsl/Service/AttachDisk/0x8007000fしかたがないのでMicroSDをUSBアダプタに指してVisionFive2のUSBポートにさしてマウントするとフリーズする。
Khadas VIM1SのMicroSDスロットに直接さす。
MicroSDを使わずないで起動しているKhadas VIM1SのMicroSDスロットに直接さして操作する。
sudo fdisk -l
~
Disk /dev/mmcblk1: 119.08 GiB, 127865454592 bytes, 249737216 sectors
Units: sectors of 1 * 512 = 512 bytes
Sector size (logical/physical): 512 bytes / 512 bytes
I/O size (minimum/optimal): 512 bytes / 512 bytes
Disklabel type: gpt
Disk identifier: E05DB137-41F7-47A6-B1C1-E9BE91A4BC0E

ls -al /dev/mmcbl*
brw-rw---- 1 root disk 179, 32 Aug 27 08:17 /dev/mmcblk0
brw-rw---- 1 root disk 179, 64 Aug 27 08:17 /dev/mmcblk0boot0
brw-rw---- 1 root disk 179, 96 Aug 27 08:17 /dev/mmcblk0boot1
brw-rw---- 1 root disk 179, 33 Aug 27 08:17 /dev/mmcblk0p1
brw-rw---- 1 root disk 179, 34 Aug 27 08:17 /dev/mmcblk0p2
crw------- 1 root root 239,  0 Aug 27 08:17 /dev/mmcblk0rpmb
brw-rw---- 1 root disk 179,  0 Aug 27 08:17 /dev/mmcblk1
brw-rw---- 1 root disk 179,  1 Aug 27 08:17 /dev/mmcblk1p1
brw-rw---- 1 root disk 179,  2 Aug 27 08:17 /dev/mmcblk1p2
brw-rw---- 1 root disk 179,  3 Aug 27 08:17 /dev/mmcblk1p3
brw-rw---- 1 root disk 179,  4 Aug 27 08:17 /dev/mmcblk1p4
/dev/mmcblk1p4 が「/」っぽいのでマウント
sudo mkdir /mnt/microsd
sudo mount /dev/mmcblk1p4 /mnt/microsd
/(ルート)ディレクトリを全部削除(202306イメージのDebianが入っている)
sudo rm -rf /mnt/microsd/パーティション拡大
202306をインストールした直後だと/dev/mmcblk1p4が2.5GBしかないのでMicroSDカードをめいいっぱい使えるようにする。
sudo fdisk /dev/mmcblk1

Command (m for help): p
~
Device          Start     End Sectors  Size Type
/dev/mmcblk1p1   4096    8191    4096    2M HiFive BBL
/dev/mmcblk1p2   8192   16383    8192    4M HiFive FSBL
/dev/mmcblk1p3  16384  221183  204800  100M EFI System
/dev/mmcblk1p4 221184 5527518 5306335  2.5G Linux filesystem

Command (m for help): d(削除)
Partition number (1-4, default 4):(Partition4を削除)

Partition 4 has been deleted.

Command (m for help): n(Partition作る)
Partition number (4-128, default 4):(Partition4を作る)
First sector (34-249737182, default 221184):
Last sector, +/-sectors or +/-size{K,M,G,T,P} (221184-249737182, default 249737182):

Created a new partition 4 of type 'Linux filesystem' and of size 119 GiB.
Partition #4 contains a ext4 signature.

Do you want to remove the signature? [Y]es/[N]o: n(どっちだろう?)

Command (m for help): p(Partitionできてるかチェック、/dev/mmcblk1p4が119GBになる)

Disk /dev/mmcblk1: 119.08 GiB, 127865454592 bytes, 249737216 sectors
Units: sectors of 1 * 512 = 512 bytes
Sector size (logical/physical): 512 bytes / 512 bytes
I/O size (minimum/optimal): 512 bytes / 512 bytes
Disklabel type: gpt
Disk identifier: E05DB137-41F7-47A6-B1C1-E9BE91A4BC0E

Device          Start       End   Sectors  Size Type
/dev/mmcblk1p1   4096      8191      4096    2M HiFive BBL
/dev/mmcblk1p2   8192     16383      8192    4M HiFive FSBL
/dev/mmcblk1p3  16384    221183    204800  100M EFI System
/dev/mmcblk1p4 221184 249737182 249515999  119G Linux filesystem

Command (m for help): w(保存して終了)
The partition table has been altered.
Syncing disks.

最後に以下実行
sudo resize2fs /dev/mmcblk1p4
コピー
WindowsのUbuntuではうまくMicroSDがマウントできなかったので、WinSCPで先ほど作った「visionfive2.base.tar.gz」ファイルをKhadas VIM1Sにコピー、Windosからアップロードが遅い・・・
cd ~#Khadas VIM1Sのホーム/home/khadasにコピーした。
sudo tar pxf visionfive2.base.tar.gz  -C /mnt/microsd/
sudo sync
sudo umount /mnt/microsd
VisionFive2からKhadas VIM1Sに直接コピー。 SCP遅いので arcfourのゆるい暗号化で強度さがるけど転送速度速め -C arcfour オプション付けたけどダメだった。
scp visionfive22.base.tar.gz khadas@192.168.31.239:/home/khadas/
sudo tar pxf visionfive22.base.tar.gz  -C /mnt/microsd/
コピー終わるまでじっくり待つしかない。
Ubuntu起動
VisioFive2にできたMicroSDをさしてディスプレイ・キーボード接続して起動する。
最初はこんなメッセージが表示されて止まる。
Failed to start Device-Mappr Multipath device Controller.が、しばらく経つと動き出す。
有線LANで起動してSambaまでインストールできた。
あとはWifiをどうにかしてつなげられれば完了、ですが難航して結局ダメ。
Samba
まずはSambaインストール
Samba
sudo apt install samba

cd /etc/samba/
sudo cp -a smb.conf smb.conf.default

共有するフォルダを指定↓
sudo vim /etc/samba/smb.conf
[play2t]
path = /mnt/play2t/
browsable = yes
writable = yes
guest ok = no
read only = no

ユーザー・パスワード設定(ユーザーはDebianにあるユーザーのみ登録可能)
sudo smbpasswd -a user
Passを2回聞かれる

リロード
sudo smbcontrol smbd reload-config

状態表示↓
sudo systemctl status smbd
Wsdd2インストール
sudo apt install wsdd2
sudo systemctl enable --now wsdd2.service
Sambaが起動しない?
sudo systemctl status smbd
? smbd.service - Samba SMB Daemon
     Loaded: loaded (/lib/systemd/system/smbd.service; enabled; vendor preset: >
     Active: failed (Result: exit-code) since Tue 2023-08-29 02:19:42 UTC; 1min>
       Docs: man:smbd(8)
             man:samba(7)
             man:smb.conf(5)
   Main PID: 903 (code=exited, status=255/EXCEPTION)
     Status: "Starting process..."
        CPU: 178ms

Aug 29 02:19:42 visionfive2 systemd[1]: Starting Samba SMB Daemon...
Aug 29 02:19:42 visionfive2 systemd[1]: smbd.service: Main process exited, code>
Aug 29 02:19:42 visionfive2 systemd[1]: smbd.service: Failed with result 'exit->
Aug 29 02:19:42 visionfive2 systemd[1]: Failed to start Samba SMB Daemon.
smb.conf がおかしいので見直す。
sudo vim /etc/samba/smb.confWifi つかえるようにする
結果!いまのところWifi使えない(泣)
適当にドライバーあてようとしましたが、ウチにあるWifiのUSBドングルはすべてRISC-Vに対応していないのか?うまくインストールできなかった。(以下メモ)
ESWIN 6600U (VisioFive2買ったときに付いてたWifi USBドングル)
sudo apt install usbuti
lsusb
Bus 002 Device 001: ID 1d6b:0003 Linux Foundation 3.0 root hub
Bus 001 Device 004: ID 3452:6600 ESWIN 6600U
Bus 001 Device 003: ID 2717:003b Xiaomi Inc. MI Wireless Mouse
Bus 001 Device 005: ID 05ac:024f Apple, Inc. Aluminium Keyboard (ANSI)
Bus 001 Device 002: ID 2109:3431 VIA Labs, Inc. Hub
Bus 001 Device 001: ID 1d6b:0002 Linux Foundation 2.0 root hub

I-O DataのWifiドングルさして再度確認
lsusb
Bus 002 Device 001: ID 1d6b:0003 Linux Foundation 3.0 root hub
Bus 001 Device 004: ID 3452:6600 ESWIN 6600U
Bus 001 Device 006: ID 04bb:0951 I-O Data Device, Inc. WN-AC433U
Bus 001 Device 002: ID 2109:3431 VIA Labs, Inc. Hub
Bus 001 Device 001: ID 1d6b:0002 Linux Foundation 2.0 root hub
git clone https://github.com/eswincomputing/eswin_6600u
cd eswin_6600u

????
make ARCH=riscv CROSS_COMPILE=/usr/lib/riscv64-linux-gnu KERNELDIR=target/lib/modules/5.15.0/build KBUILDDIR=target/lib/modules/5.15.0/build product=6600u
RISC-V対応してないのかな?
WN725N(TP-LINKの無線LAN 子機 USBドングル)
ここにドライバーある↓
sudo apt-get install dkms

git clone -b v5.6.4.2 https://github.com/aircrack-ng/rtl8812au.git

cd rtl8812au

sudo make dkms_install
mkdir: created directory '/usr/src/8812au-5.6.4.2_35491.20191025'
cp -r * /usr/src/8812au-5.6.4.2_35491.20191025
dkms add -m 8812au -v 5.6.4.2_35491.20191025
Creating symlink /var/lib/dkms/8812au/5.6.4.2_35491.20191025/source -> /usr/src/8812au-5.6.4.2_35491.20191025
dkms build -m 8812au -v 5.6.4.2_35491.20191025
Error! Your kernel headers for kernel 5.15.0-starfive cannot be found.
Please install the linux-headers-5.15.0-starfive package or use the --kernelsourcedir option to tell DKMS where it's located.
make: *** [Makefile:1786: dkms_install] Error 1

sudo make dkms_install
mkdir: created directory '/usr/src/8812au-5.6.4.2_35491.20191025'
cp -r * /usr/src/8812au-5.6.4.2_35491.20191025
dkms add -m 8812au -v 5.6.4.2_35491.20191025
Error! DKMS tree already contains: 8812au-5.6.4.2_35491.20191025
You cannot add the same module/version combo more than once.
make: *** [Makefile:1785: dkms_install] Error
他にもドライバーがあった。
git clone https://github.com/lwfinger/rtl8188eu.git
cd rtl8188eu

make
make ARCH=riscv64 CROSS_COMPILE= -C /lib/modules/5.15.0-starfive/build M=/home/go/rtl8188eu  modules
make[1]: *** /lib/modules/5.15.0-starfive/build: No such file or directory.  Stop.
make: *** [Makefile:155: modules] Error 2

sudo ln -s /usr/src/linux-riscv-5.19-headers-5.19.0-1021 /lib/modules/5.15.0-starfive/build
make
make ARCH=riscv64 CROSS_COMPILE= -C /lib/modules/5.15.0-starfive/build M=/home/go/rtl8188eu  modules
make[1]: Entering directory '/usr/src/linux-riscv-5.19-headers-5.19.0-1021'
Makefile:711: arch/riscv64/Makefile: No such file or directory
make[1]: *** No rule to make target 'arch/riscv64/Makefile'.  Stop.
make[1]: Leaving directory '/usr/src/linux-riscv-5.19-headers-5.19.0-1021'
make: *** [Makefile:155: modules] Error 2
Network-managerインストール
CUIでWifiの設定ができる便利ツール
sudo apt -y install network-manager
sudo nmtui
まぁ、一応それぞれのドングルでドライバー入ってなくてもWifiつながると思いましたが、甘かった・・・
カーネルアップデートしないほうがいい
Ubuntuの状態でRISC-Vに対応していないのか?やらないほうがいい、エラーになる。
uname -r
5.15.0-starfive

sudo apt-cache search linux-image-5.
linux-image-5.15.0-1007-generic - Linux kernel image for version 5.15.0 on RISC-V SMP
linux-image-5.15.0-1028-generic - Linux kernel image for version 5.15.0 on RISC-V SMP
linux-image-5.17.0-1010-allwinner - Linux kernel image for version 5.17.0 on RISC-V
linux-image-5.17.0-1012-starfive - Linux kernel image for version 5.17.0 on RISC-V
linux-image-5.19.0-1011-allwinner - Linux kernel image for version 5.19.0 on RISC-V
linux-image-5.19.0-1012-allwinner - Linux kernel image for version 5.19.0 on RISC-V
linux-image-5.19.0-1013-allwinner - Linux kernel image for version 5.19.0 on RISC-V
linux-image-5.19.0-1014-allwinner - Linux kernel image for version 5.19.0 on RISC-V
linux-image-5.19.0-1015-allwinner - Linux kernel image for version 5.19.0 on RISC-V
linux-image-5.19.0-1016-starfive - Linux kernel image for version 5.19.0 on RISC-V SMP
linux-image-5.19.0-1017-generic - Linux kernel image for version 5.19.0 on RISC-V SMP
linux-image-5.19.0-1017-starfive - Linux kernel image for version 5.19.0 on RISC-V SMP
linux-image-5.19.0-1018-generic - Linux kernel image for version 5.19.0 on RISC-V SMP
linux-image-5.19.0-1018-starfive - Linux kernel image for version 5.19.0 on RISC-V SMP
linux-image-5.19.0-1019-generic - Linux kernel image for version 5.19.0 on RISC-V SMP
linux-image-5.19.0-1019-starfive - Linux kernel image for version 5.19.0 on RISC-V SMP
linux-image-5.19.0-1020-generic - Linux kernel image for version 5.19.0 on RISC-V SMP
linux-image-5.19.0-1020-starfive - Linux kernel image for version 5.19.0 on RISC-V SMP
linux-


sudo apt-get remove linux-image-5.19.0-1021-generic

sudo apt install linux-image-5.19.0-1018-starfive
/usr/bin/linux-update-symlinks line 64.
dpkg: error processing package linux-image-5.19.0-1021-generic (--remove):
 installed linux-image-5.19.0-1021-generic package post-removal script subprocess returned error exit status 1
dpkg: too many errors, stopping
Errors were encountered while processing:
 linux-image-5.19.0-1021-generic
Processing was halted because there were too many errors.
E: Sub-process /usr/bin/dpkg returned an error code (1)

sudo apt-get autoclean
強制削除もダメ
sudo apt-get --force-yes remove linux-image-5.19.0-1021-generic
Reading package lists... Done
Building dependency tree... Done
Reading state information... Done
The following packages will be REMOVED:
  linux-image-5.19.0-1021-generic
0 upgraded, 0 newly installed, 1 to remove and 0 not upgraded.
1 not fully installed or removed.
After this operation, 32.2 MB disk space will be freed.
W: --force-yes is deprecated, use one of the options starting with --allow instead.
Do you want to continue? [Y/n] y
(Reading database ... 68713 files and directories currently installed.)
Removing linux-image-5.19.0-1021-generic (5.19.0-1021.23~22.04.1) ...
Failed to create symlink to vmlinuz-5.15.0-starfive: Operation not permitted at /usr/bin/linux-update-symlinks line 64.
dpkg: error processing package linux-image-5.19.0-1021-generic (--remove):
 installed linux-image-5.19.0-1021-generic package post-removal script subprocess returned error exit status 1
dpkg: too many errors, stopping
Errors were encountered while processing:
 linux-image-5.19.0-1021-generic
Processing was halted because there were too many errors.
E: Sub-process /usr/bin/dpkg returned an error code (1)

sudo dpkg -r linux-image-5.19.0-1021-generic
(Reading database ... 68713 files and directories currently installed.)
Removing linux-image-5.19.0-1021-generic (5.19.0-1021.23~22.04.1) ...
Failed to create symlink to vmlinuz-5.15.0-starfive: Operation not permitted at /usr/bin/linux-update-symlinks line 64.
dpkg: error processing package linux-image-5.19.0-1021-generic (--remove):
 installed linux-image-5.19.0-1021-generic package post-removal script subprocess returned error exit status 1
Errors were encountered while processing:
 linux-image-5.19.0-1021-generic
以上、あまり約にたつ情報がなくて申し訳ございませんが、VisioFive2でUbuntuにしたらあまり使えなくなるという結果です。
VisioFive2から202308イメージがアップされましたのでこちらを使ったほうが良いかと思います。


コメント